Creating Lasting Memories: A Guide for the Perfect Sparkler Exit
- Grace Ell
- Nov 14, 2023
- 5 min read
Soon-to-be-wedded couple,
As you embark on your journey of marital bliss, consider adding a touch of enchantment to your wedding day with a sparkler “exit”. This magical tradition not only symbolises the bright start of your new life together but also provides a stunning backdrop for unforgettable photographs. Here's some advice to ensure your sparkler exit becomes a radiant and cherished moment in your wedding album.
Choose the Right Sparklers: Opt for long-lasting sparklers to ensure they burn brightly throughout your exit. Selecting 18in sparklers will give you a burn time of about 1minute 40. Not all guests will want to come out into the cold but you want enough sparklers to give your photographer a second chance. Some sparkler tags contain matches but outside these rarely work as they struggle to strike without going out. Time is of the essence so ideally everyone’s sparklers need to be lit in close concession. I recommend having at least three wind resistant lighters. Once enough people have a sparkler lite others can light from their’s quite quickly. Top tip Sparklers that are lit together will stick if they touch.
Inform Your Guests: Ensure everyone is on the same page by informing your guests about the sparkler exit in advance. Include details in your wedding program or have your toast master make an announcement. This will help create anticipation and ensure a smooth transition from ceremony to celebration.
Provide Sparkler Handling Instructions: Include clear instructions on how to handle sparklers safely. Place signage or have your wedding coordinator/photographer brief guests on proper sparkler etiquette. Safety is key to ensuring everyone enjoys the moment without any accidents. Have a spare bucket containing sand so that guests have a safe place to put lit or spent sparklers in.
Designate a Sparkler Coordinator: Assign someone, whether it's a friend, family member, or wedding planner/coordinator, to coordinate the sparkler exit. This person can distribute sparklers, help guests light them, and ensure a well-organised and beautiful exit.
Coordinate with Your Photographer: Work closely with your photographer to plan the perfect sparkler exit. Discuss ideal timings, location, lighting conditions, and any specific shots you'd like to capture. Having a clear plan will result in breathtaking photos that you'll cherish forever.
Choose a Scenic Exit Location: Your photographer will be the best person to help pick a location for your sparkler exit. They will either have worked that venue before to know what’s worked best in the past or they will be able to think about it when they recce the venue otherwise the wedding coordinator should be helpful. Whether it's the venue's garden, a grand staircase, or an open courtyard, a beautiful backdrop can enhance the magic of the moment and creates stunning visual memories but it needs to be realistic and not be too far away from the party/warmth.
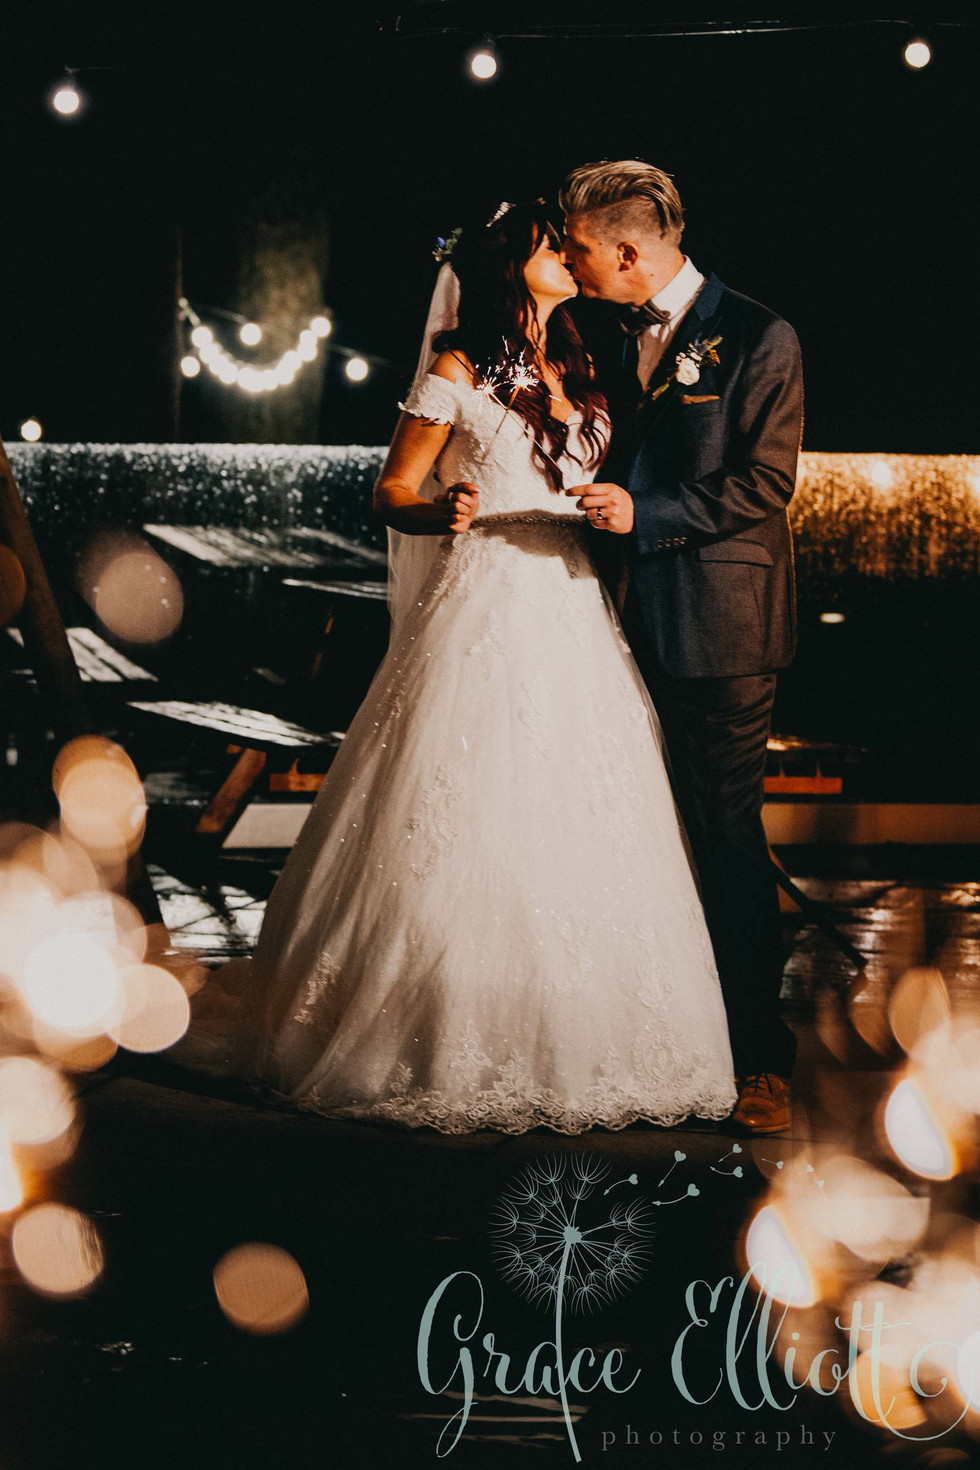
Embrace the Moment: When the time comes, take a deep breath, hold hands, and savor the moment. Walk slowly through the glowing tunnel of sparklers, and let the joy and love of the occasion wash over you. This is your moment – enjoy it! I always recommend the Bride & Groom to stop in the middle and kiss staying as still as possible so that the camera has time to focus, this ensures you will get at least one great shot.
Congratulations on your upcoming wedding!
Warm regards,
Grace


Aperture f/2.8, shutterspeed 1/125 ISO 1600 handheld, video light,


Aperture f/2.8, shutterspeed 1/125 ISO 1600 handheld, video light


Aperture f/1.4, shutterspeed 1/50 (Tripod) ISO 800


Aperture f/2.8, shutterspeed 1/160 ISO 640 handheld. moments after sunset
Photographers point of view/settings
Sparklers add a touch of magic to any celebration, and as a photographer, capturing their brilliance can elevate your images to new heights. I'll share tips and techniques to help you master the art of photographing sparklers and create mesmerizing shots that truly sparkle.
Gear Preparation: Ensure you have the right gear for the job. A camera with manual settings, a sturdy tripod, and a remote shutter release can make a significant difference in capturing sharp and steady sparkler shots. Personally rather then use a tripod I prefer to have a LED video light on the horse shoe as it gives your camera chance to capture focus and leaves you with more flexibility/movement.
Choose the Right Settings: Opt for a low ISO setting (around 100-200) to minimize noise, and use a narrow aperture (f/8 or higher) to maintain a deep depth of field. Set your shutter speed to a few seconds to capture the trail of light as the sparkler moves.
AutoFocus is Key: Switch to auto focus to ensure your camera doesn't struggle in low-light conditions. Focus on your subject before the sparkler is ignited, and then switch to manual focus to lock it in. If you are going for a tripod manual focus may be better as you will have less light due to different settings.
Frame Creatively: Plan your composition in advance. Experiment with different angles and perspectives to add interest to your shots. Consider using the sparkler as a leading line or framing your subject with the sparkler's glow.
Communication:Explain to the Bride and Groom what you want them to do, there’s usually a fair amount of alcohol been drunk by this point so it works well to have explained the plan before the wedding day and then go over it quickly just beforehand. I like to have my B&G hold sparklers as they walk because it helps add more light to their faces, I have them stop in the middle and kiss staying as still as possible and then once they get to the end of the crowd do the same thing again.
Mind the Background:A cluttered background can distract from the beauty of the sparkler. Look for clean and simple backgrounds to make your subject and the sparkler stand out. I often like to have a bit of ambient light in the background rather then all black so have a think of which you would prefer & then pick your location.
Experiment with Shutter Speed:Play around with various shutter speeds to achieve different effects. A slower shutter speed captures more light trails, while a faster speed freezes the sparkler's movement. Find the balance that suits your creative vision.
Lighting Conditions:Timing is crucial when shooting sparklers. Wait until the ambient light is low enough to allow the sparkler's glow to dominate without overexposing the scene. Twilight or nighttime settings are ideal for capturing the magic. My favourite time is to start organising just after sunset, shooting within 20-30 minutes of then
Safety First:Ensure the safety of your subjects by providing clear instructions on how to handle sparklers safely. Be mindful of the surroundings and keep a safe distance to avoid accidents.
Post-Processing Magic: Enhance your sparkler shots in post-processing by adjusting exposure, contrast, and colors. Experiment with different filters and effects to bring out the enchanting glow of the sparklers.
Conclusion: Mastering the art of sparkler photography takes practice and experimentation. By following these tips, you'll be well on your way to creating captivating images that encapsulate the magic and joy of any celebration. So, grab your camera, embrace the sparkle, and let your creativity shine!


Comments